Sunburst Effect In #GIMP Quick And Easy

Learn To Create Sunburst Effect In GIMP
So you are here to learn to create an awesome sunburst effect in GIMP, so first if you don't have Gimp just download it from here, it's just a small program that is on par with Photoshop but the best part is that that it's completely free. My version of GIMP looks dark and has a little more options than the one that you might have, don't worry I am not gonna use any features that you might not have so just follow along.

So let's get started you can watch the video if you prefer video content and even subscribe to my channel for more such videos. It will be uploaded soon.

For a written approach just follow along:

1. Open and create a NEW FILE(Size: 1280 x 720) in GIMP.

Size : 1280 x 720
2. Use the Fill tool and fill in a dark grey(505050) color.


Color: #505050
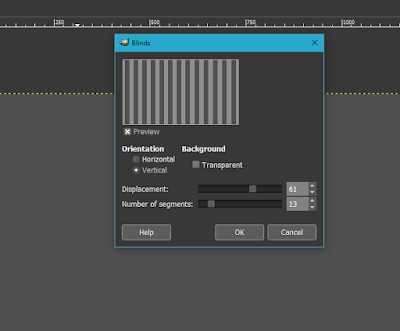
3. Use the Filters>Distorts>Blinds filter with the values from image below. And make sure the background colour is set to a lighter grey(A0A0A0). 


BG color is the color behind the dark grey in the color selection.
Blinds Filter Settings

4. Next use Filters>Distorts>Polar Coordinates filter with the below values. And hit OK.


Polar Filter
Settings


5.Give it some Blur using the Filters>Blurs>Blur option. To Get rid of jaggy edges.


Blur it a couple of times.

6. Finally add a grunge texture(Search "grunge" on Google to get it) dragging it onto the image and set it to overlay and ~60% opacity. Lastly Hit the Colors>Colorize option with the sunburst effect layer selected. And set the color up want.


Make sure that the Sunburst Layer is selected before colouring.
And you are done have fun with your basic sun burst effect.
My Final Image is there in the Background of the thumbnail.

[QUICK NOTE: To have broader lines just increase the displacement a little in the blinds filter.]

Like!. Share!. And Comment for more tutorial suggestions and any other awesome tricks. :)


Comments

Popular posts from this blog

Glitch(Chromatic Abberation) Effect In GIMP Quick And Simple

So have been tried of seeing people make horrible glitch effects in GIMP then you have come to the right place. So we shall be going through this awesome tutorial about making an awesome glitch(chromatic abberation) effect in GIMP which is rather simple and quick.  Photoshop has numerous features that make making such effects easier, but GIMP is not a waste it also has the same awesome capabilities just waiting to be tapped. So let me shut up and start on with the tutorial. A video version will be upload soon enough. For the written version just follow along: 1. Open an Image in GIMP. Locate The Image on Your Computer 2. Click On Channels next to the layers tab. Or open it by going into Windows>Dockable Windows>Channels. And select Red. Select Red In the Channel Dialog 3. Goto Filters>Distorts>Ripple. Goto Ripple Effect 4. Use the following settings in Ripple. And hit OK. Use the above settings 5. And you are done. Add some Noise

Photo/Image Editing Tools For Free: Alternatives To Photoshop

Photo Editing Program Photo-editing is a part of daily life of every person now-a-days so doing some photo editing should obviously be free but it isn't if your demands are high. Like if you chase professionalism so what to do, get a 10$ subscription for Photoshop or use the boring paint tool and hope for a miracle. Well if that's the question you are facing then the answer is write here. So here is a list of 4 different "FREE & OPEN SOURCE" photo-editing tools each one has a forte. So let's get started. GIMP Super popular and among the top contenders of photo-editing just like Photoshop, has ample lot of features and just as many plugins, though some are now outdated and need to be re-written. But being open-source and free even you guys can write a plugin for it for your needs, though it has got a complex code-base. Currently the latest release is 2.8.20, beta version of 2.9.x is already out. And the work being currently done on 2.10 for various fe